Securing your WordPress site is something that should not be taken lightly. If you lived in a crime ridden neighborhood, you’d probably put locks on your door. Your website exists in a crime ridden world full of hackers and viruses and as such you should put some locks on your site. One step that you can take to bolster your site’s security is to add security measures to the login page of your site.
Things you can do to increase the security on your WordPress Login Page:
- Create a unique Username
- Change your password to be at least 12 characters long and not easily guessable.
- Change the default login URL to something unique.
- Implement Two-Factor Authentication
- Use a Plug-in to add security questions to the Login Page
- Limit the number of login attempts
- Enable reCAPTCHA
When it comes to bolstering your login page security the very first step you should take is to pick a unique username and a strong password. The default username for WordPress installs is Admin. You will want to change this to something unique. While some say that a username can’t be changed after it is set, in this article we’ll go over how you can. You will also want your passwords to be a least 12 characters long and not easily guessable. The next step you can take is to change the default login URL to something unique. This is a controversial step as some say it helps and others say it doesn’t. It probably won’t keep dedicated hackers from finding your login page, but it can’t hurt and might keep out casual snoops. This can be accomplished by using a plugin such as WPS Hide Login. To further bolster your login you can activate two-factor authentication. Two-factor authentication requires you to enter your login credentials plus a secret code that is sent to a different device such as your phone. Two factor authentication is available with plugins such as WordFence, Google Authenticator, and others. This is an excellent way to boost site security but can be cumbersome if you log into your site a lot. Luckily, plugins such as WordFence have workarounds to this annoyance. You can also use plugins to add security questions to the login page of your site. This is similar to two factor authentication but is a little less secure. However, unlike two factor authentication, It has the benefit of not needing an external device. Last, but certainly not least, you can limit the number of login attempts and enable reCAPTCHA on your site to block bots from spamming your site with login attempts.
Those are the suggestions of how to secure your site, but lets jump into the details of how we actually implement each of them on the login page of a site.
Strong Passwords and unique Usernames are Key
Your website security should begin with picking a strong username and password. This seems like basic information, but many people still use Admin for their username and Password123 for their password. If this or something similar is your login credentials, hackers won’t have a difficult time accessing your site.
When it comes to picking a username it doesn’t need to be long and confusing, but it should be unique. The default username for WordPress Installs is Admin. If you didn’t change this username when you first installed WordPress or if whoever built the site for you didn’t change the username then the default username will be “Admin.” While some would argue that having a unique username doesn’t really matter, it is half the battle when it comes to logging in. So pick a username that is unique from other usernames you have used, easy to remember, and easy to type out. At least then a hacker can’t just put in Admin and be good to go.
Changing your WordPress Username
If Admin is your username or if you just think that your username is too basic, then you can change the username… kinda.
Once a user has been created for a site you can’t change their username. When you installed WordPress you entered a username and password. This created an Administrator user account for you for that site. This means that if you set a common username during the set-up process, your administrator account will forever have that username.
So how does one change a username? To change a username you’ll have to create a new user for the site, set the new user as an admin, enter the new username you wish to use, and hit create. Then delete your old admin user account with the weak username. That sounds messy but it is rather straight forward once you begin.
Begin by logging into your site and navigating to the “Users” Tab located in the left-hand tool bar.
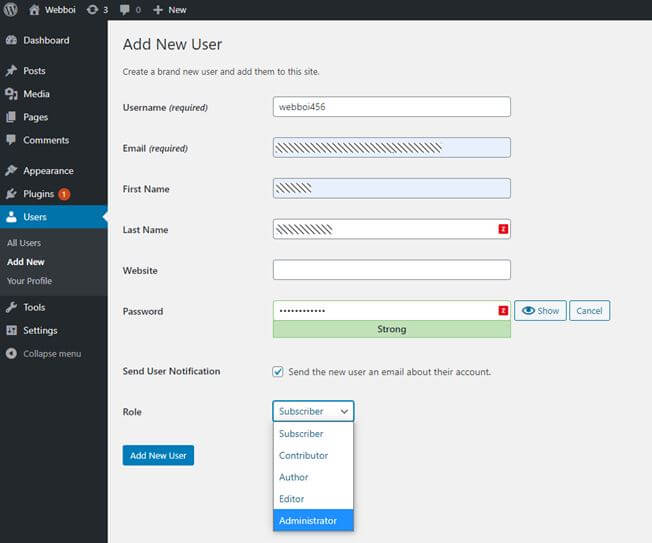
Next, click the button that says, “Add New.” This will open a new user form. Enter the new username you want to use as well as your other information. Make sure that you select “Administrator” from the “Role” dropdown menu. Also, make sure that you take note of the password WordPress generates for the new user or input your own password in the field. When you are done, click “Add New User.”
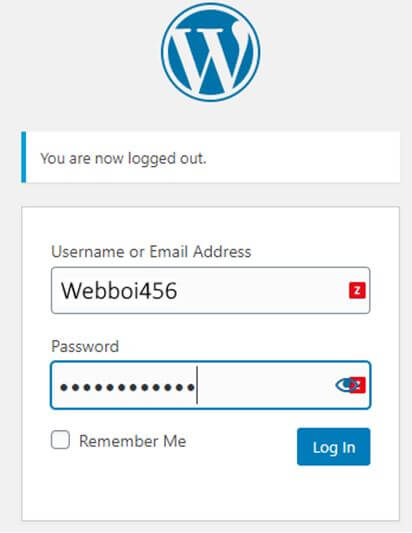
Next, log out of your site by clicking your name or username in the top right corner and selecting logout. This will take you to the login page of your site. Log in using the new username and password you just created.
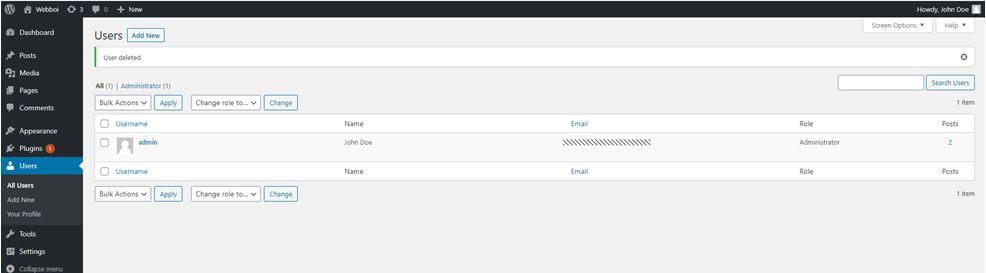
Navigate back to the “Users” tab where you will now see both of your administrator accounts. Hover your mouse over the old account you no longer want and click the “delete” option.

This next part is important. When you click the delete button, you’ll be prompted to decide what happens with the content created by the user. Select the “Attribute all content to” option and select your new account. If you select the other option, all the content you’ve created on your site under your old account will disappear. That would make for a very bad day.
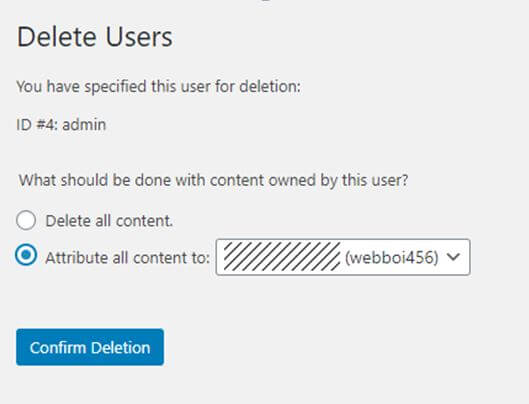
Confirm the deletion and you are done. You now have a new username to log in with.
Choosing a Strong Password
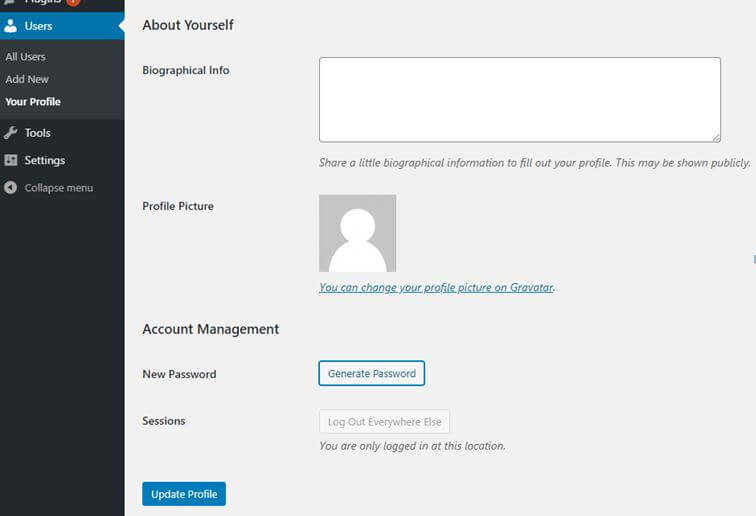
While choosing a unique username is recommended, choosing a strong password is crucial! When it comes to choosing strong passwords, think length first and randomness second. Professionals suggest that length is more important than randomness. They recommend that a password should be a minimum on 12 characters, but ideally 16 or more. Of course, as computers get faster passwords will need to be longer to compensate. Some professionals say that just picking a few words that wouldn’t usually go together, but that provide a good character count is better than a shorter random string of gibberish. This has the added benefit of being easier to remember than %1Fkd8*g. WordPress will automatically generate a very strong password when you create new users. If your password is weak, it is easily changed by editing your user account and clicking generate password. This will assign your account a new password. Make sure you write this password down somewhere, save it in a password manager, or copy and paste it into a document.
If you have a weak password but haven’t had any problems yet, consider yourself a blessed individual and change that password to something strong.
Changing Your WordPress Login URL
Changing your WordPress login URL is another way to bolster security. It’s worth noting that there is a lot of disagreement concerning changing your login URL. Some people say it is not helpful and others say that it is. The bottom line is that it won’t keep someone who knows what they are doing from finding your login page, but it can help keep lightweights and casual snoops from accessing it. The process for changing it is also relatively simple so there is not much harm in taking this step.
The easiest and safest way to change your login URL is to install a plugin. I use WPS Hide Login. This is a free plugin that allows you to set a custom URL for the login page. I like this plugin because it doesn’t actually change any files in the WordPress core. This is a good thing because it means that the plugin isn’t likely to cause problems on your site or interact badly with other plugins. It simply intercepts page requests and basically renders the /wp-admin, /login, and other variations useless.
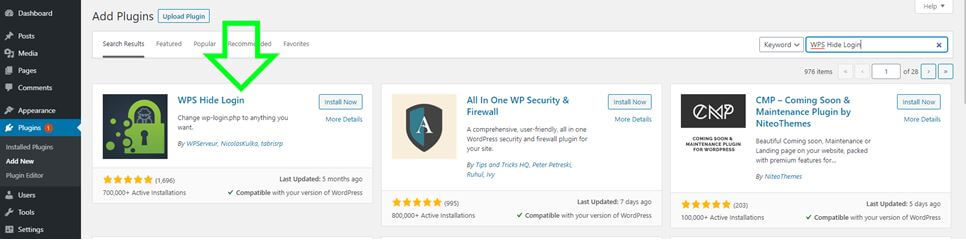
To use this plugin, begin by clicking the “plugins” tab on the left-hand side of your control center. At the top of the screen click the button that says, “Add New.”

This will take you to a page where you can search and install new plugins. In the search bar, search for, “WPS Hide Login.” Once you’ve found it click “Install Now.” After it installs click “Activate.”
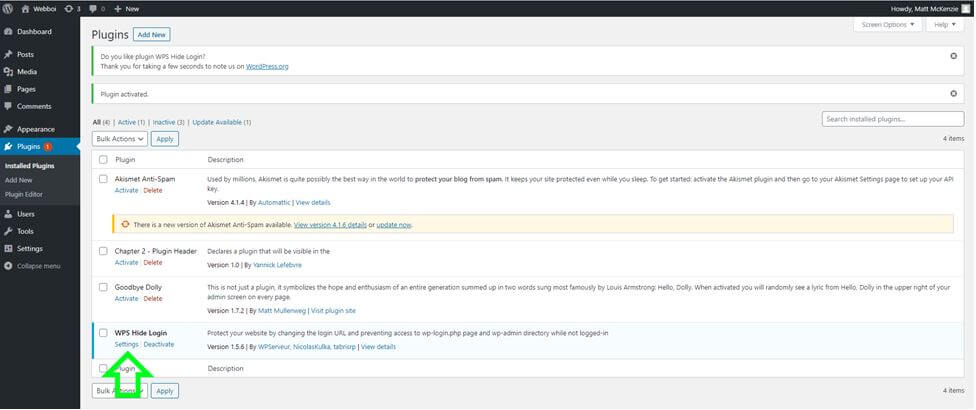
This should take you the “Installed plugins” page, but if it does not then navigate there. Once you are there, find the WPS Hide Login plugin and click on “Settings.”
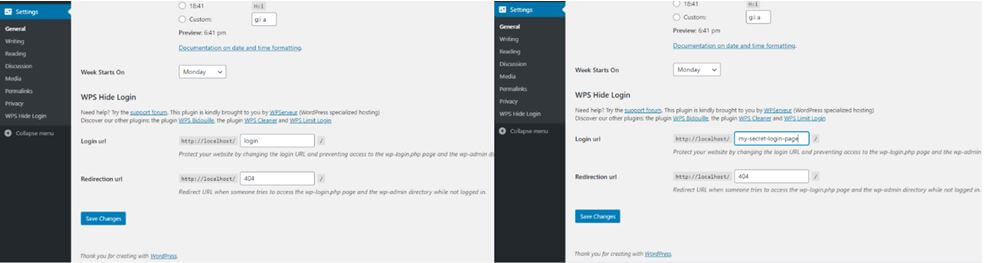
Scroll down to the bottom of the page to the “Login URL” option and change it from “login” to whatever custom URL you want it to be. There is also an option of where to redirect to if someone attempts to access the login page with the old URL. By default it redirects to a “404 page not found” page, but you could always create a custom page that tells them that they are a noob, to stop being a hacker, and suggests they reevaluate their life decisions.
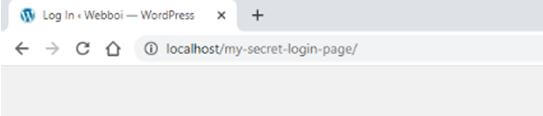
Log out of your site. This will take you back to the login page. If you look at the URL, you will notice that the old URL is now replace with your new login URL. Congratulations, you’ve just changed your old login URL to a new custom login URL! If you want to go back to the old URL, simply disable the plugin and everything will return to default.
Add Two Factor Authentication
If you really want to bolster that login security, then activate two-factor authentication. This is one of the most secure login forms available.
Two factor authentication requires that you not only enter a username and password, but also a secret code that is securely sent to some other device (usually a phone or tablet). This means that in order for someone to access your site through the login page, they would have to know your username, password, and somehow have obtained the secret code sent to you. If they managed that it means they probably stole your phone, in which case you are really in trouble.
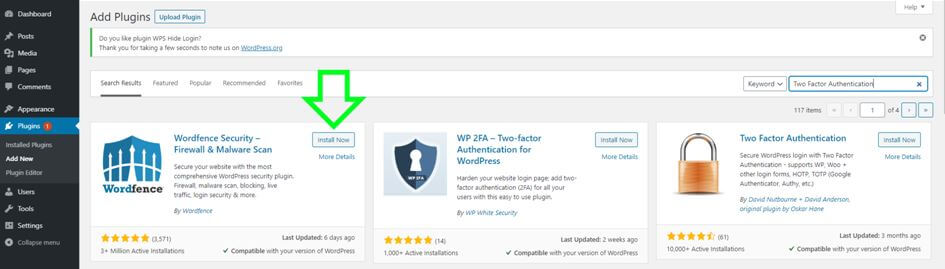
Two factor authentication does not come default with your installation of WordPress, it must be added via plugins (This is not the case if you created a site on WordPress.com). To set up two factor authentication, begin by logging into your site and navigating to the plugins tab. Type “Two Factor Authentication” in the search bar. As you’ll see, there are a lot of plugins available that provide two factor authentication. The plugin I use for two factor authentication (and for many other security features) is WordFence.
Find WordFence and click the button that says, “Install Now.” When it has finished installing, click the button that says, “Activate.”
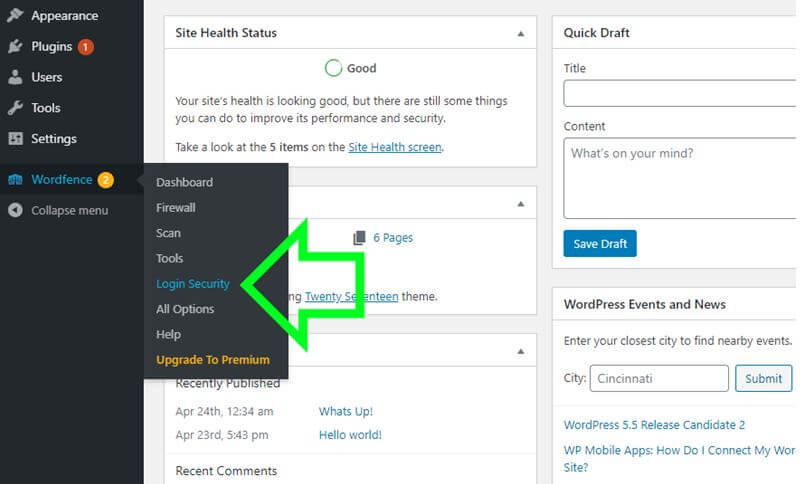
In the left-hand toolbar, there will now be an option called “WordFence.” Hover over this option and then select “Login Security” from the dropdown menu that appears.
This will take you to the screen to activate Two Factory Authentication. WordFence two factor authentication requires that you have an Authenticator app on a device such as your phone or tablet. I use the app Authy on my phone. There are several apps that work with this plugin. Check out this article for a full list of supported apps.
On the main screen you will see two options for connecting the plugin to your authenticator app. The first and easiest to use is a QR code. Simply open your authenticator app and scan the QR code. This will link your site to the app. If you can’t scan the QR code, you can enter the rather lengthy text key located below the QR code.
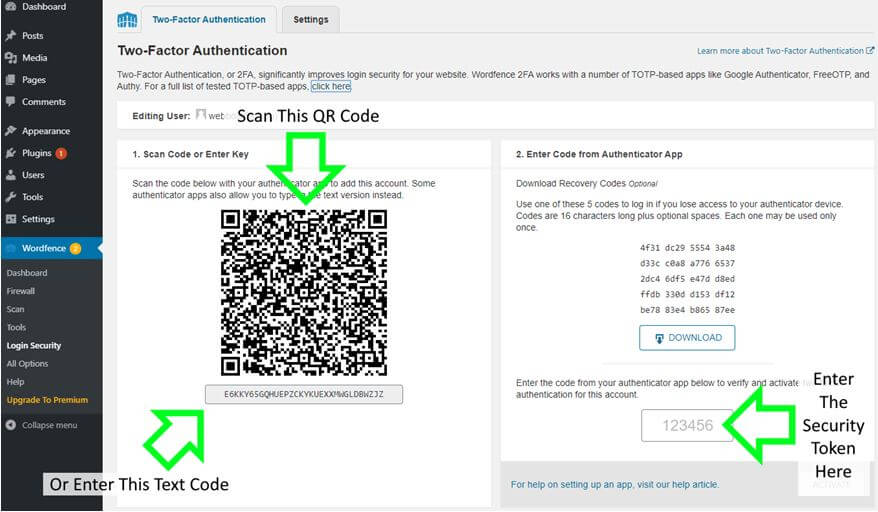
After you scan the QR code or enter the text key, the app will provide you with a security token. Enter this in step 2 of the plugin in the box that says “123456.” Depending on the app you use, there may be some intermediate steps (such as creating password for backups) between scanning the QR code and entering the authentication token.
It’s a good idea to download the recovery codes. These will allow you to access your site should your device with the authentication app get lost or stolen.
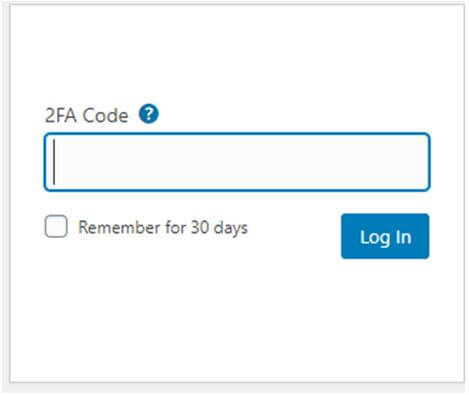
Now test out your two factor authentication by logging out of your site then attempting to log in. After you enter your username and password, a new step will appear asking you to enter you login token.
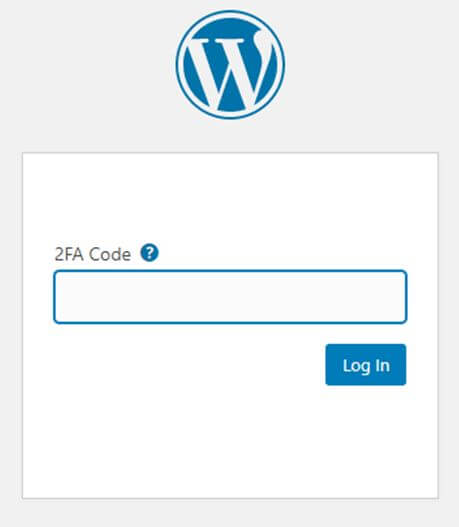
Open the authenticator app, find the token, and enter the token in the two factor authentication field on your site’s login page. If all goes well, you’ll be in!
Two factor authentication is a terrific way to secure your login page. However, it does have its draw backs. The main drawback is that it takes extra time to login to your site. If you are logging in and out of your site a lot, this can be quite annoying. One way to overcome this is to go to the two factor authentication settings and check the box that says, “Allow remembering device for 30 days.”
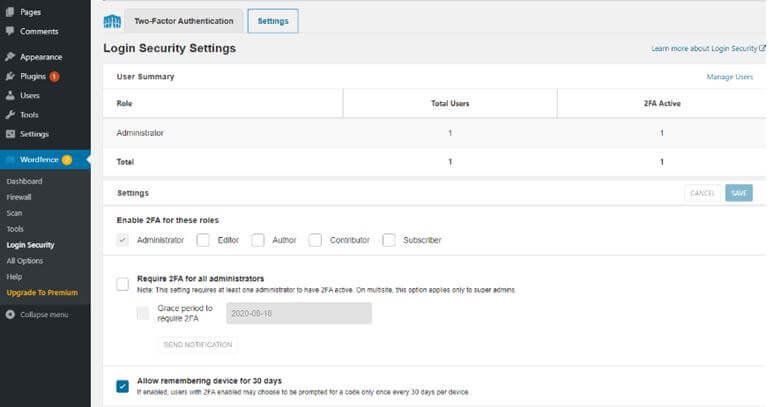
The next time you log in to your site there will be a box below the two-factor authentication field that says “remember me for 30 days.” Checking this allows you to bypass the step in future logins. However, if you or someone like a hacker tries to login from a device other than your own, the two-factor step will be reinstated.
Add Login Page Security Questions
Another method to secure your site is to implement security questions on your login page. This is similar to two factor authentication but doesn’t require you to have an external device every time you want to sign in. It works by asking a preset question that only the account owner would know the answer to. For example, what was the name of your 5th grade teacher? This adds an extra layer of security because a hacker would have to know your username, password, and the answer to the security question.
The downside to security questions is that in todays interconnected world, finding answers to security questions is possible. Finding out the someone’s mother’s maiden name is doable with public records. Finding the name of someone’s pet can often be found on social media posts. This makes it less secure than something like two factor authentication.
While it is not an impenetrable defense, it’s one more deterrent that can help make hackers feel like they are wasting their time. Security questions do not come default with WordPress installs, but they can be added via a plugin.
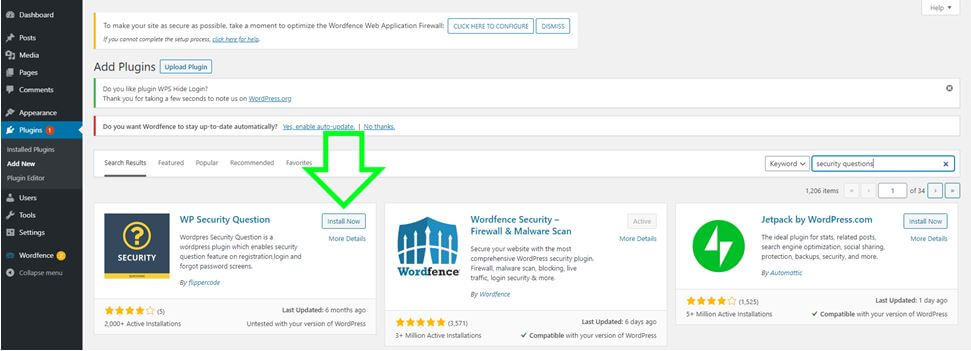
To add security questions to your site, begin by clicking the plugins tab on the left of your screen and then clicking “Add New” on the plugins page. In the search bar, type “Security Questions.” There is only one plugin I could find specifically dedicated to security questions and that is WP Security Questions. Other general security plugins may also have support for security questions, but for this demonstration I’ll be using WP Security Questions.
Click the install now button and when it has finished installing, click Activate.
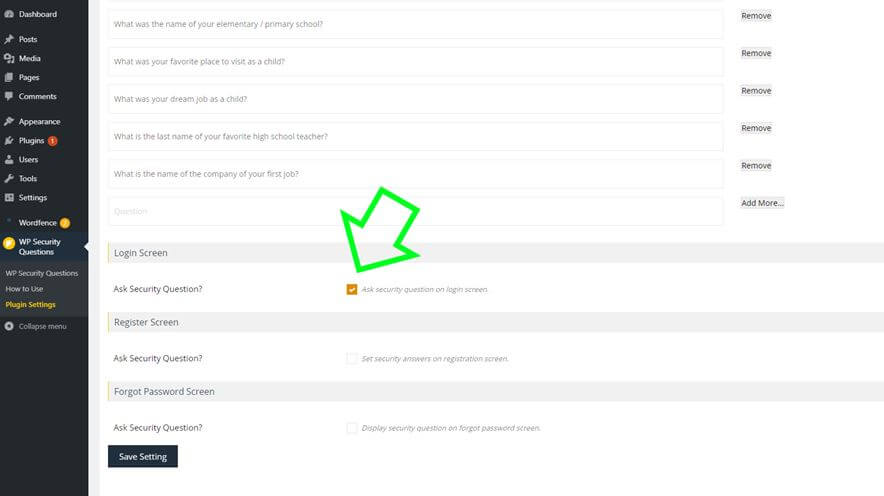
After you have activated the plugin, look in the toolbar on the left-hand side of your screen. There should now be “WP Security Questions” option. Hover over this option and select “Plugin settings” from the dropdown menu.
On this page you will be able to add and edit questions and decide what pages the security question will be asked on. Scroll to the bottom of the page and check the “Login Page” box. If you want, you can edit existing questions, remove questions as options, and add your own questions. You do not provide answers to the questions on this page. When you are done, hit “Save Setting.”
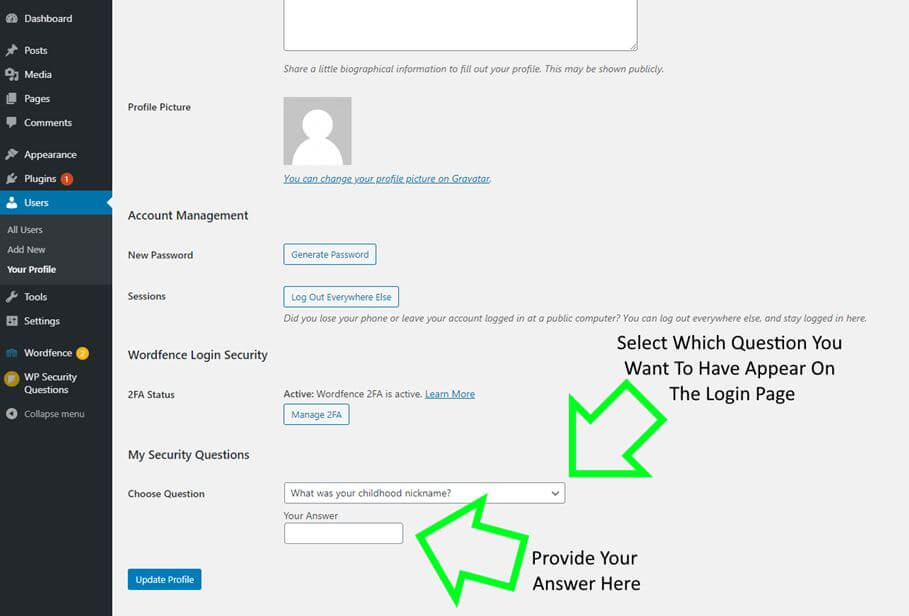
Next, go to the user tab and select your user profile. Scroll to the bottom of the page and you’ll find a dropdown menu containing questions and an answer field to provide your answer. Choose which question you want to have show up on the login page. With the free version of this plugin, you can only have one security question attached to you user. After you’ve picked the question you want, provide your answer in the answer field. When you are finished, hit “Update Profile.”
When you log in to your site, you will now be asked to provide a username, password, and be asked to provide an answer to the security question.
It is worth noting that if you leave the answer field blank in the plugin setup step, then no answer will be required on the login page. The question will still be asked on the login page, but no answer is required to login. This gave me a small heart attack when I logged out of my site without inputting an answer in the plugin setup and was asked to provide an answer when I tried to log back in. I thought I was hosed. However, after my heart returned to a normal pace, I just entered my username and password in the correct fields, left the security question field blank, and logged in.
That is all there is to setting a security question on your login page. While this method isn’t the most secure thing on the planet, it does add a little bit of additional security.
Block Brute Force Attacks by Limiting Incorrect Login Attempts
If a hacker is lucky enough to guess a password thy should stop being a hacker and play the lottery. But most hackers don’t rely on luck to crack passwords. They just try as many passwords as they can in hopes of eventually hitting on a winner. One way to negate this type of hacking is to limit the number of allowed login attempts. This is accomplished with a plugin. WordFence is the plugin I use to add this feature to my site. If you don’t want to use WordFence, just type in “Limit Login” in the plugin search bar and choose one of the many other plugins that offer the same feature.
To Install this feature, click on the plugins tab on the left hand of the screen and then click the add new button at the top of the plugin screen. Search for WordFence and click the install now button. Once it installs, click the activate now button. After you activate WordFence, it will automatically apply login attempt limiting (i.e. brute force protection) to your login page. The default allows 20 wrong attempts and then locks that user out for 4 hours. If you wish to customize this, follow the steps below.
After Installing and activating WordFence, a WordFence option should appear in the tool bar on the left of your screen. Hover over this option and select Firewall from the dropdown menu.

Towards the right of the screen will be a status indicator for brute force protection. Beneath that there will be a link that says, “Manage Brute Force Protection.” Click on the link.

This will take you to the page where you can manage your login attempts settings. The options are pretty self-explanatory, and in reality, the defaults are pretty decent settings. If you want to know more about each option and what good values are for each settings, either click the small question mark next to the setting in question, or follow this link to an article by the WordFence Pros.
Block Nasty Bots by Enabling reCAPTCHA
The last way that we’ll talk about to protect you login page is to enable reCAPTCHA on you login page. reCAPTCHA (the updated version of CAPTCHA) allows you to filter out human users from bots. Bots are nasty little fellows who will fill data fields, such as your login, with spam and try to submit it. They are often used in brute force attacks because they can run all day and night entering passwords and usernames in an attempt to log in. CAPTCHA, which stands for “Completely Automated Public Turing test to tell Computers and Humans Apart,” is a tool that will block bots from submitting anything to your site. WordFence is the plugin that I use to enable reCAPTCHA, but there are many other plugins available that can enable it too. If you haven’t already, install and activate WordFence on you site.
To enable reCAPTCHA using WordFence, hover your mouse over the WordFence option in the toolbar on the left of your screen and select “Login Security” from the dropdown menu.
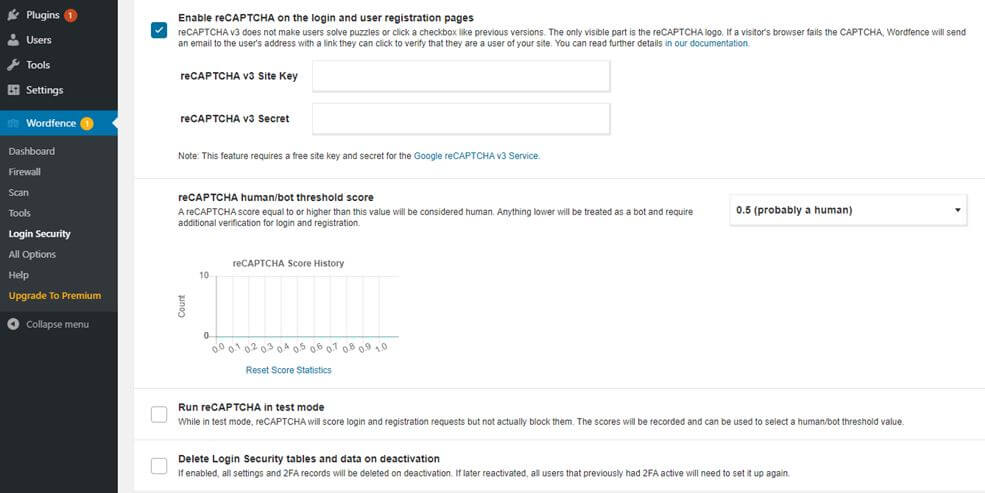
On the Login Security page, select the tab that says “Settings.” Scroll down to the bottom of the page and you will find the reCAPTCHA settings. From these option, click the box that says, “Enable reCAPTCHA on the login and user registration pages.” You’ll then need to enter the site key and secret key.
To obtain a site key and secret key, go to Google and type in reCAPTCHA, then select the result from google.com. This should be the first result. It should be mentioned that in order to obtain the keys, you will need to have a google account. If you have one, make sure you are signed in. If you don’t, you will need to sign up for one.
Once you are signed into google and on the main page for reCAPTCHA, look up in the top navigation bar and click on the option that says “User Admin.” This will take you to a page where you can register your site, and obtain your keys.

Begin by giving your site a label. This is simply a name to make it easier for you to work with your site in the future. This is especially important if you have lots of sites. Next, you’ll need to enter your site domain. If your site is example.com, then enter example.com in the domain field. After that, just read and except their short terms of use and hit submit.

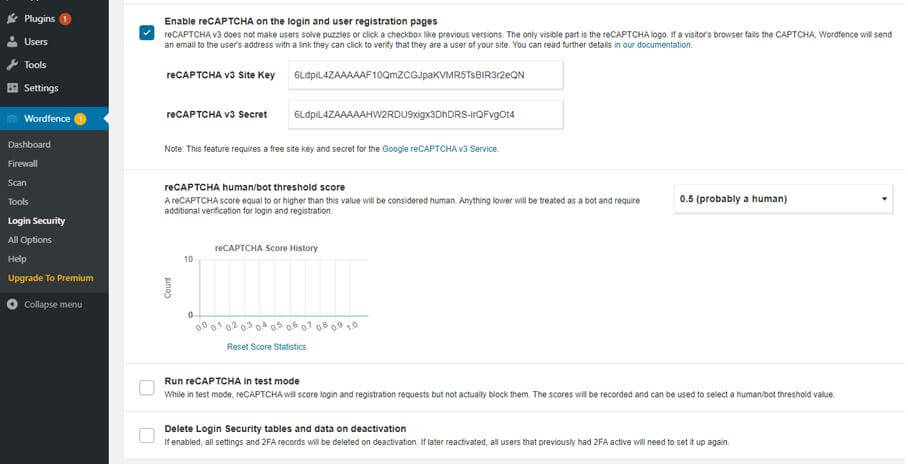
This will take you to a page containing your generated site key and secret key. Copy these keys and paste them in the appropriate fields in the WordFence Login Security settings. When that is complete, scroll to the top of the Login Security Settings page and hit “Save Settings.”

That’s it, you are done! Next time you log in, there will be a small box in the bottom corner showing the reCAPTCHA symbol.
Wrapping it Up
When it comes to running a site, security should be an upmost concern. While no amount of security can completely guarantee protection, the steps above, implemented individually or collectively, can bolster your login page security, and deter attackers from accessing you site. Of course, hackers might find other ways of accessing your site, but with the above methods you can rest assured that even experienced hackers will break a nervous sweat when probing your login. If you want to learn about other common issues that plague WordPress site owners or simply how to make your site better, check out some of our other articles!