Setting up your first Shopping Campaign in Google Ads can be intimidating, but it doesn’t have to be! Shopping Campaigns are a great way to promote your products, giving detailed information to your user before they even click your ad.
How to Set up a Shopping Campaign in Google Ads
• Sign in to your Google Ads account
• From the left page menu click Campaigns
• Select New Campaign
• Select your campaign goal
• Select Shopping as your campaign type
• Click Continue
• Choose your advertising preferences and customize your campaign
• Click Save and Continue
1. Sign in to your Google Ads account
This first step probably seems pretty obvious, but we thought we’d cover it anyways. If you haven’t created a Google Ads account yet, click the Start Now button to create one. If you already have a Google Ads account, click the Sign In button on the home page.
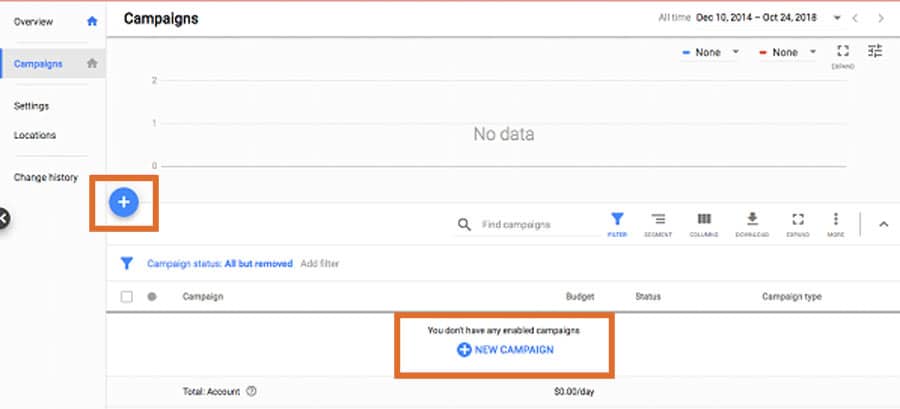
2. Select Campaigns from the left page menu
Once you’re into your Google account, there should be a left page menu. Click on the Campaigns button.
3. Click on New Campaign
If you already have a campaign set up in your Google Ads account, click the blue + button and then New Campaign. If you do not already have a campaign set up, you can click on the blue + button, or you can click directly on the New Campaign button in the middle of the screen.
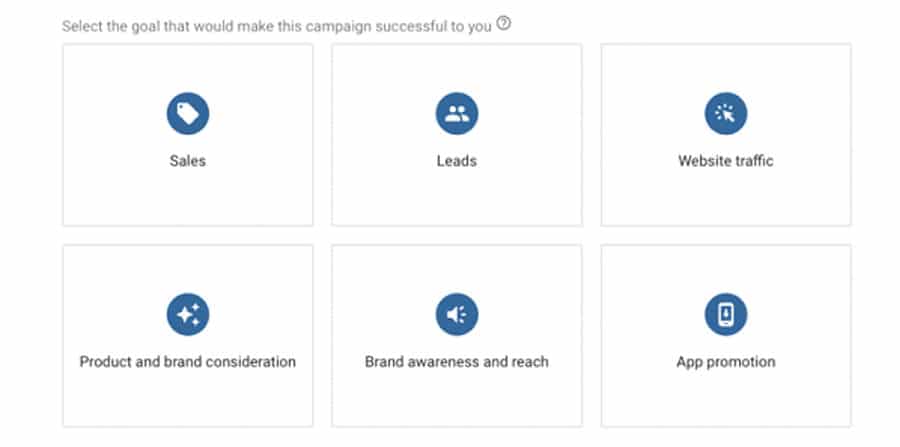
4. Select your campaign goal
For every new campaign you create, you must select what you want the goal of the campaign to be. What do you want to gain from this campaign? The following are the six campaign goals Google Ads allows you to choose from.
Sales
– The Sales goal is exactly what it sounds like. It makes the main focus, purpose, and goal of your campaign to generate sales. Your landing pages will feature products you have for sale, and your ads may include price extensions or keywords like “Free Shipping”. This goal works well for most general products or services but isn’t always the most effective if you’re trying to sell high ticket items.
Leads
– The Leads goal focuses on generating leads for your business. Your landing page may be a form to collect emails or addresses to add prospective clients to mailing lists. Leads are a great way to figure out which of your prospective clients are actually going to buy, and this goal is especially good to use if your product has a higher price tag.
Website Traffic
– The purpose of the Website Traffic goal is to get people to your site. If your business is a blog, or a news site, this is the perfect campaign goal for you. Your website is the star of the show, and you want it to be the main focus of your prospective customers.
Product and Brand Consideration
– Brand Consideration means that prospective customers will remember your brand and think of it the next time they want to buy something. This will lead to more purchases down the road as more people recognize and remember your brand.
Brand Awareness and Reach
– The Brand Awareness and Reach goal is primarily used to get your business out there. If you have a brand-new start-up company, chances are not many people have heard of it. By getting your brand out there you can extend your reach and increase the awareness prospective customers have of your brand.
App Promotion
– App Promotion is exactly what it sounds like. You have an app and you want to promote it. Whether it’s a brand new application, or something that’s been around for decades, there can be many different reasons why you may want to promote your app.
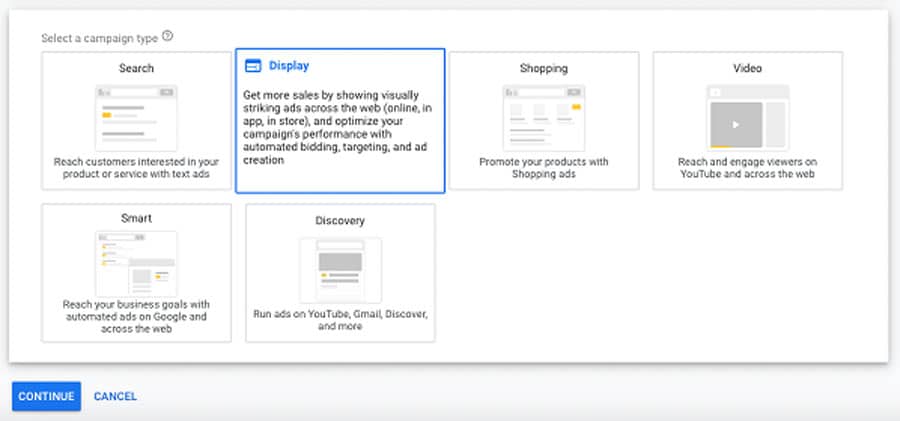
5. Select Shopping as your campaign type
The next page will ask you to select one of six different campaign types. Campaign types determine what kind of campaign you are creating, the kinds of ads that are shown, and more. Select Shopping from the listed choices.
6. Click Continue
Now that you have chosen your campaign goal and type, you can move on to actually building out your campaign. Click Continue to begin writing ads, customizing settings, and creating extensions.
7. Choose your advertising preferences and customize your campaign
The nest thing your will need to do is name your campaign, select the Merchant Center account you would like to advertise products from, select the location you would like to target or exclude, select the languages you would like to use in your ads, create an inventory filter if you do not want to advertise all of the products within your Merchant Center account, and then enter your budget.
Your campaign can be named anything you want. You can name it after the campaign type, the campaign goal, the products this campaign will advertise, or even just “1”.
The locations you want to target or exclude is much more important. If you are a large business with national shipping options, you’ll want to make sure to include all the areas you ship to. Similarly, if you ship everywhere in the U.S. except for Hawaii or Alaska, make sure to exclude those two states in the location settings. If you are a small local shop, you will want to enter your address and only advertise to those within a 25-mile radius or so or your business. Missing this step can be very harmful to your business, because you only want to advertise to people who actually have access to your product.
If you have already set up your Merchant Center account and exported it to Google Ads it should show up automatically for your to apply to your campaign. If you have not set up your Merchant Center account or exported it to Google Ads you will need to do this before continuing with your Shopping Campaign.
Next you will need to enter the languages you want to use. You may only want to use one language, or you may want to use many. It all depends on your business and who you are wanting to reach.
Finally, you will need to enter your budget. Even if your budget is fairly large, it is best to start small with brand new campaigns and slowly increase the budget as the campaign continues to perform well. Starting off with a very large budget before your campaign has time to gain traction could cause your ads to tank.
You will likely notice there is also an option to create ad extensions for your campaign. Ad extensions can be very beneficial to your ads and can greatly increase your click-through-rate and conversions. However, it is not necessary to create them now as you can always go back and add them in later.
8. Click Save and Continue
Click the Save and Continue button at the bottom of the page and your campaign will be saved! You will still need to enter your keywords and write your ads before your campaign will be eligible to run, but the settings you have previously entered can be saved and returned to at a later date to finalize the campaign.
Congratulations! You now have your very own Shopping Campaign
Commonly Asked Questions:
Do I need to set up ad extensions?
No! When used correctly ad extensions can help improve your ads. However, they are far from necessary. It is better to not use ad extensions than to use them incorrectly.
What should my budget be?
While it greatly varies between different business and different campaigns, I tend to set most of my campaigns at a starting budget of $5. I watch my new campaigns closely and if they perform well, I might raise the budget. However, if they do not perform well, I make sure to quickly fix the problem or lower the budget if the campaign is hurting the overall account.
How do I know if my campaign is performing well?
While what is considered “good performance” greatly varies from business to business, there are a few things to look for when you’re first getting started. A CTR (click through rate) of 2% or higher is considered a good interaction rate with your website, and anything below a 1% is very bad. When looking at conversions, the best tool to use is the Conversion Value/Cost. This calculates your ROAS (return on ad investment) and a ROAS higher than 4 is generally considered good.