Why Use Redirects?
A redirect sends a quick message to your user’s browser and tells them that the page has been moved so that the browser can automatically point them to the new page. There are various types of redirects for various purposes, but in this post we will focus on 301 redirects. A 301 redirect permanently moves a page to a new location.
This is used when a page on your site has been moved, when an old page has been deleted and replaced with something better, or when you want to change the permalinks of your posts. If you don’t set up a redirection for these events, it will cause your users to see a 404 page not found error and they won’t be able to see the content of your site.
This is obviously bad for user experience and site interaction, but it can also greatly impact your SEO ratings, so it’s not something you typically want to allow happen.

How to Create Redirects Using Plugins in WordPress
The best approach to setting up 301 redirects is to use one of the many WordPress redirect plugins available to you. This allows you to set up all the redirects you need, without ever having to write a single line of code.
1.Redirection
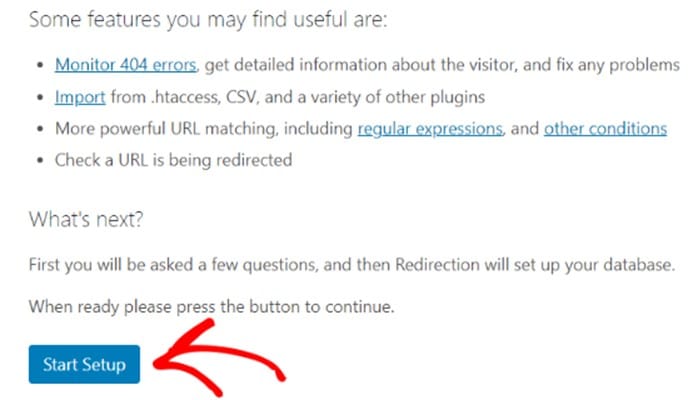
A great way to add and manage redirects in WordPress is by using the Redirection plugin. It is a free plugin that makes it simple and easy to manage 301 redirects. After installing and activating the plugin on your site you’ll need to go to Tools > Redirection and click on Start Setup to set up plugin.
You can also select options to monitor permalink changes and keep a log of all redirects and 404 errors. These settings don’t have to be enabled, and you can leave them disabled if you’d prefer, but for best practices we recommend enabling and utilizing these settings for your redirects.

The plugin will then test the Rest API. If the status comes back as good, you can click Finish Setup and the plugin will be ready to use. Under Tools > Redirection > Redirects you can start creating your 301 redirects. The basic redirection settings will pop up right away, but if you click on the small gear icon down below you can look at additional options to choose your redirection type.
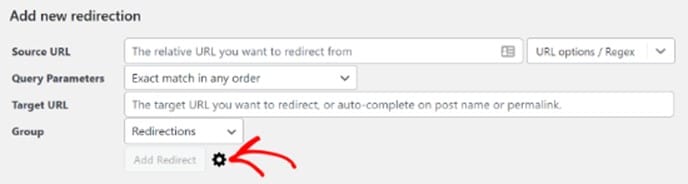
To set up the redirect you just have to enter the source URL of the old page and enter the new URL that you want users redirected to. Then set the HTTP code option to 301 – Moved Permanently from the dropdown menu. Once you’ve added all the details and adjusted your settings you can click Add Redirect to save it.
2.All in One SEO (AIOSEO)
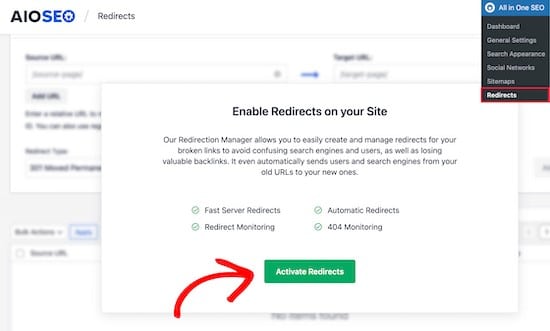
AIOSEO is a great tool to use to simply create and manage 301 redirects without ever writing a writing of code. It is rated one of the best SEO plugins and is used by millions of professions. In addition to providing helpful SEO uses, AIOSEO also offers a powerful redirection manager that makes it incredibly easy to find broken links throughout your site and fix them. Note that while there is a free version of AIOSEO, you will need the pro version to use the redirection manager.
You’ll first need to install and activate the AIOSEO Pro plugin on your website. Once the plugin is activated, you can go to All in One SEO > Redirects and click on Activate Redirects.
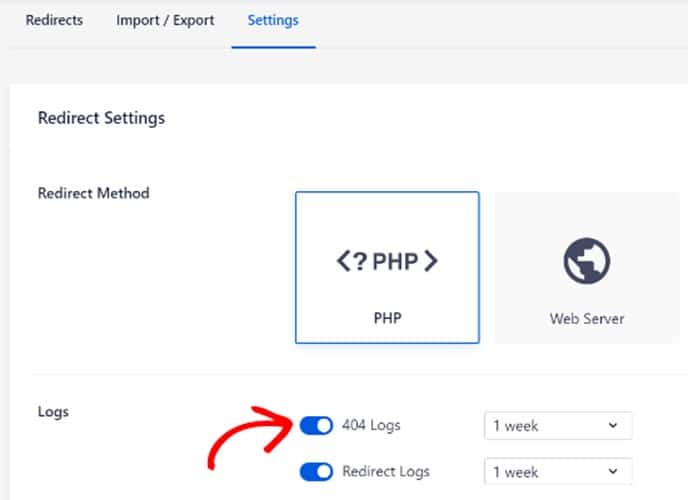
Next, if you look under the Settings tab under Redirects you can select PHP at the redirect method. While you don’t have to use this method, we recommend you do because it is the easiest method for creating redirects that doesn’t require any addition configuration. AIOSEO also lets you select Web Server at the redirect method, but it requires configuring Apache or NGINX on your wed server. These steps can get quite technical and is not recommended for beginners.

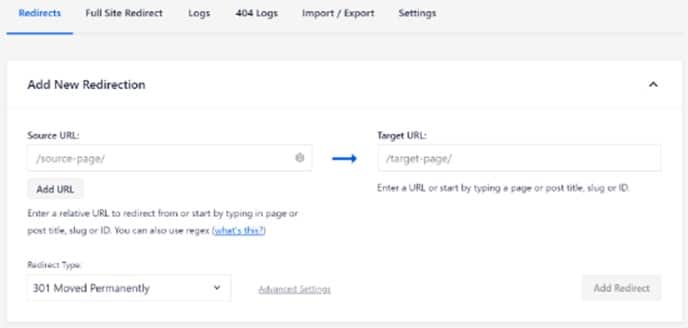
You can then head over to the Redirect tab and start creating 301 redirects. All you need to do is enter the source URL that you’d like to redirect, and the new link that you’d like to send your viewers to. Select the redirect type as 301 Moved Permanently from the dropdown menu. You can also redirect multiple URLs to the same new location but clicking Add URL underneath the Source URL field.
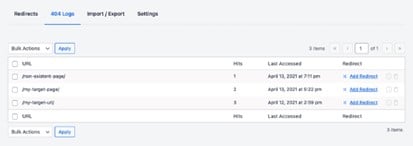
You can also scroll down to view the logs of the redirects you’ve created. This shows the number of people that visited the redirected link and it includes an option to disable your 301 redirects.

AIOSEO also helps track 404 error pages so that you can quickly fix them and avoid a stall in your web traffic. If you go into settings and scroll down to the Logs section, you can enable the options for 404 Logs and Redirect Logs. There is also an option to select the time period in which you want to keep the logs. It is recommended to keep your logs for no more than 1 month at a time to ensure fast server performance.
After enabling different option or changing any of your setting be sure to hit Save Changes. You will now see a new 404 Logs tab in your Redirects section. Keep in mind that upon first activating there won’t be any data in this section. This doesn’t mean it’s not working, it just means you don’t have any 404 errors on your site, and that’s a good thing. After enabling the settings, the plugin will start to record all 404 error messages, and you can then go in and fix any broken links the plugin finds.
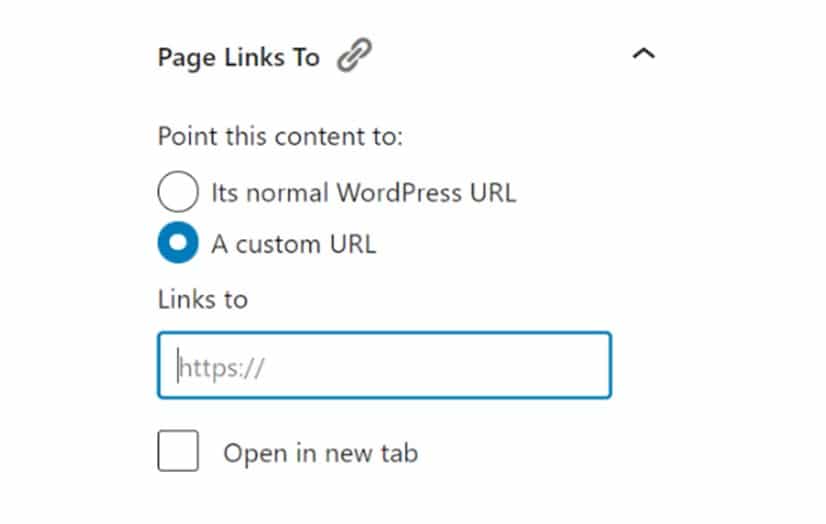
3.Page Links to
Sometimes you may want to redirect to a newer post or page but still keep the original webpage. This is where Page Links can be a very useful tool. Page Links is a simple plugin that adds a meta box onto your WordPress editor where you can simply enter the address of a new location without the old location being removed.
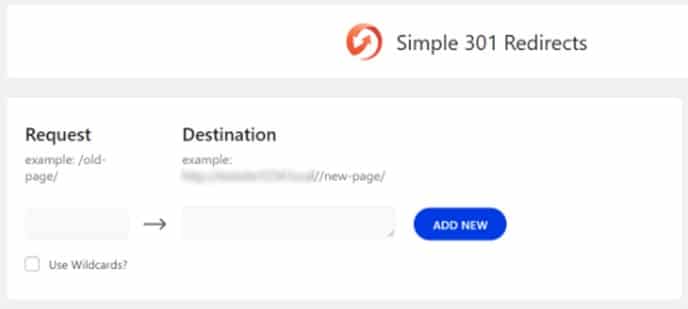
4.Simple 301 Redirects
Another easy-to-use plugin is Simple 301 Redirects. It makes setting up redirects simple and easy so that you can worry about bigger things. After installing and activating the plugin on your website you can visit Settings > 301 Redirects and enter both the old and new URLs into their respective fields. Click Add New and you’ve got a 301 redirect set up and ready to go.
Setting Up 301 Redirects in WordPress Using .htaccess
If you want to make your redirects faster, or want to avoid the use of a plugin, you can still set up 301 redirects by editing the .htaccess file.
Please keep in mind that editing the code of your WordPress site is a big deal and should not be attempted by any amateur. Any small mistake can cause very serious issues with your site, possibly even making it accessible. Changing the .htaccess file code should only be done by someone with knowledge and experience in coding.
In addition to all of this, it’s also critical to back up your .htaccess file before making any changes. This way, is a mistake is made, you are still able to revert back to the original site.
Edit your .htaccess file using All in One SEO plugin
The easiest way to access and edit your WordPress .htaccess file is by using the All in One SEO plugin for WordPress. However, if you’d like to edit the file directly without the help of a plugin there are step by step instructions on how you can do so down below.
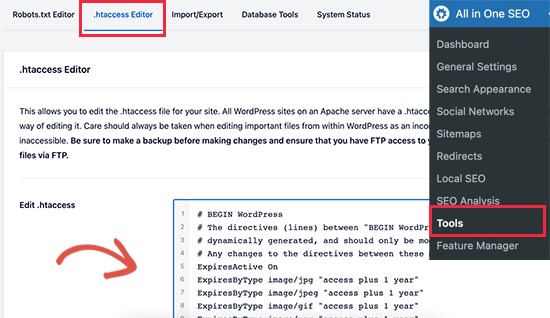
Simply install and activate the AIOSEO plugin and visit the All in One SEO > Tools page. From here you can switch to the .htaccess Editor tab.
From here you will see the contents of your .htaccess file and can simply place any redirect code that you want to add at the bottom.
Here is a simple redirect where we are sending a user visiting an old post over to a new post:
1 RewriteEngine On
2 Redirect 301 /a-very-old-post/ http://yoursite.com/a-very-new-post/
Don’t forget to click Save Changes when you’re done and AIOSEO will then update your .htaccess file for you.
Edit Your WordPress .htaccess File Directly
If you’d rather access your .htaccess file directly to set up redirects, you’ll need to connect to your website via an FTP client. The .htaccess file is in your WordPress site’s root directory and can’t just be easily accessed from anywhere.
If you can’t see your .htaccess fil there, then you’ll need to force your FTP client to show hidden files. Then you can edit the .htaccess file in any plain text editor, such as Notepad.
Here is a simple redirect where we are sending a user visiting an old post over to a new post:
1 RewriteEngine On
2 Redirect 301 /a-very-old-post/ http://yoursite.com/a-very-new-post/
You can add the code above to the end of your .htaccess file. Don’t forget to save your changes and upload your .htaccess file back to the server when you’re done. After that you can test your redirect to make sure it’s working properly.