Navigation menus are a great way to organize and categorize all of the information on your site. They can point to important areas and are a quick and easy way to get from one place to another. Navigation menus help give your site structure. While the location of your menu will depend on your WordPress theme, most menus will appear at the top of the page in a vertical drop-down format.
Creating a Custom Navigation Menu
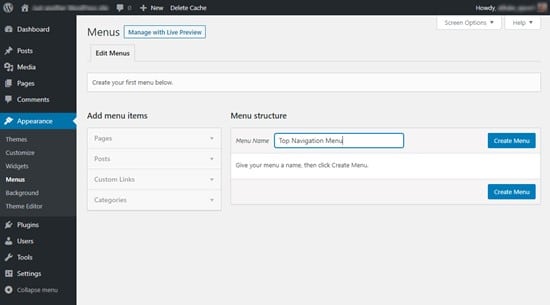
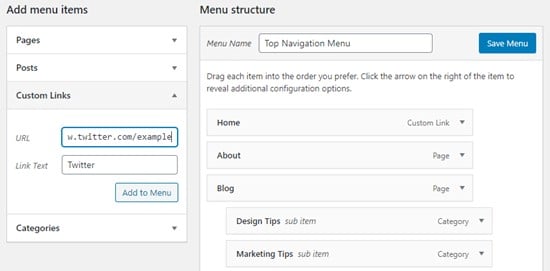
Within your WordPress dashboard go to Appearance > Menus. There will be a box on the right hand side of the screen prompting you to enter a menu name, and you can then click Create Menu.
This will then bring you to the menu settings. This is where you can select which pages, posts, custom links, or additional categories you would like to add to your menu. You can also select to auto add pages and where you’d like your menu to be displayed within the menu settings.
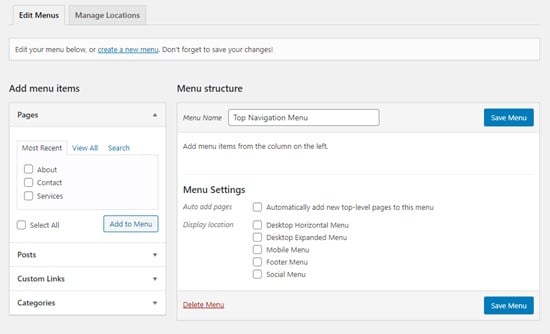
Keep in mind that once you have selected the pages you want to add to your menu you will still need to click the Add to Menu button before they will be displayed in the menu. You can click on the View All tab under Pages to see all of your pages and not just the most recent ones. You can also search for specific pages if you don’t feel like scrolling through them trying to find the ones you want to select. This process can then be repeated for any posts, custom links, or categories that you would like to add as well.
Once you have added everything that you would like to add to your menu, you will be shown a list of everything you just selected. This is a drag and drop menu so you can organize everything however you want it to be displayed. This function also allows you to create sub-categories in addition to simply putting everything in order.
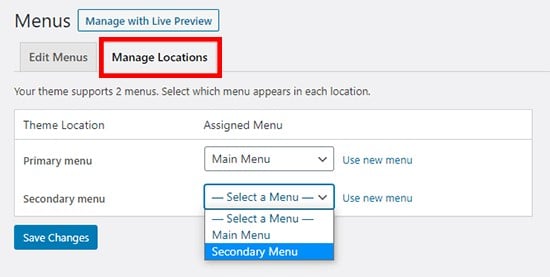
Depending on your theme, the menu will be displayed in this order either horizontally or vertically depending on the selected location. Most themes have several available sections to place a menu and all of these locations will be listed out for you next to Display location. If you’re unsure of where each location is you can try saving the menu in different places to test out which display location you like the best.
Creating Drop-Down Menus
Drop-down menus, also called nested menus, are navigation menus with parent and child menu items. This means that initially only the parent item will show, but hovering over it will bring down a sub-menu of child items beneath it. This is easily achieved using the drag and drop feature when creating or editing your menu. To do this, simply drag an item under and to the right of another item to make it a child item.
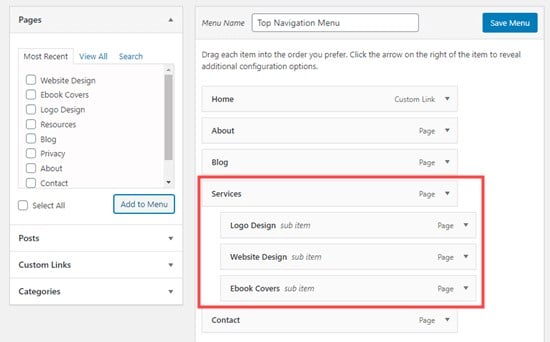
You can even add multiple layers of drop down menus, meaning that child items can have their own child items. This is an easy way to create multiple sub-categories and cleanly organize your menu. Having a well organized menu allows your users to quickly and easily navigate your site and find any desired page.
Adding Custom Links to your Menu
Custom links can be a great tool to add social media profiles, an online store, or other partner websites into your menu. All you need to do to add a custom link is enter the desired URL and the text that you would like displayed for that link. Just like with the pages, remember to click Add Link.
If you want to you can even get creative and add social media icons to your menu instead of text headings linking back to your social media accounts.
Editing Menu Items
At any time, you can go back in to your menu and make changes – most commonly adding or removing links as needed to keep your menu relevant for your website. However, there are other edits you can make as well.
When you add pages or categories to your menu WordPress automatically uses the title or name as the link text. However, if you’d rather display something else you can easily change this. Clicking on the down arrow next to any menu item will allow you to change the link text, move the item, or remove the item.

Adding Menus to Sidebars and Footers
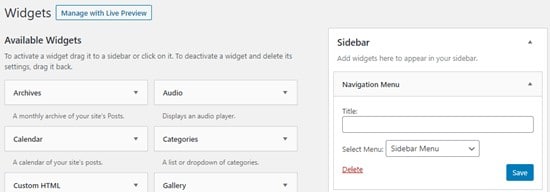
Most commonly, menus will display in your header. However, if you want to add additional menus to the sidebar or footer of your site this is also an easy fix. Under Appearance > Widgets add the Navigation Menu widget to your sidebar. You can then add a title for the widget and choose the correct menu from the Select Menu drop-down list.
Generally, if you want to add additional menus to sidebars and footers, they will be a different menu than the one used in your header. You can easily create secondary menus for these purposes under Mange Locations within Appearance > Menus.