
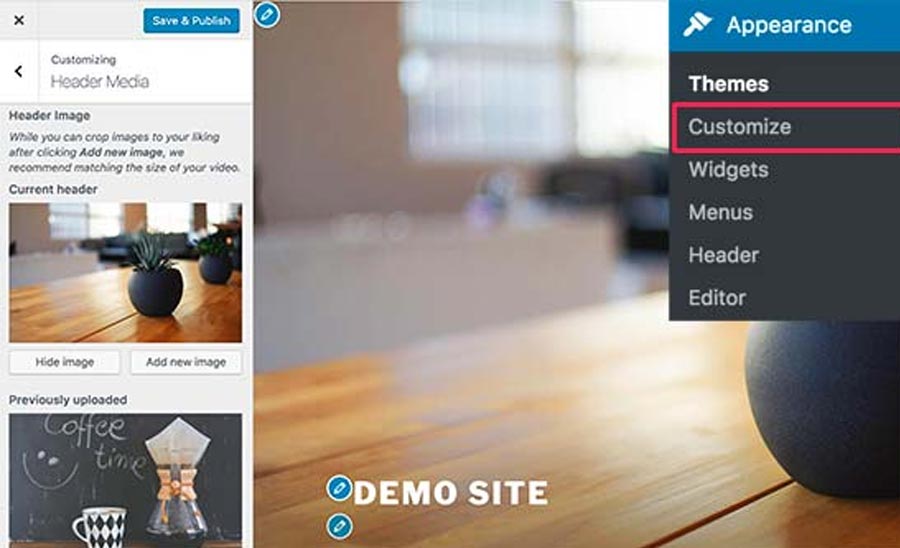
Custom headers is a theme feature within WordPress that allows for customization of the header image. Most themes have limitations for what size the header image can be, and the level of customization that is allowed will vary from theme to theme. Some themes only allow enough space for a logo, while others may allow you to customize the entire width of the header. Some themes also allow flexible headers, which will expand or contract depending on the screen size of the device being used. The option to change the headers can be found under Appearance > Customize, which is located in the left menu bar in the WordPress Admin panel. The Header link will allow you to change the header as needed or upload your own custom header. Images can be cropped to fit the header and some themes will even allow you to replace headers altogether with text either over an image or in replacement of an image.
WordPress Custom Headers: When do you actually need one?
Your header is one of the most important visual elements on your site. It occupies the topmost space of your website and is can convey a lot about your website as a whole. Additionally, studies have shown that a visitor on your site is likely to only stay for 10-20 seconds on your website so your header should be appealing and convincing. A custom header gives you a lot more control and flexibility over what you want your header to look like. You can change the header image, reposition your logo, or even add in text and widgets. Ultimately, a well-structured header should show why you are unique and give users a sneak peak into what all your site has to offer. Custom headers also allow you to have a different custom header per page. You could add a widget to your About page that doesn’t display on your other pages, or change the logo and image on your home page without affecting the rest of your site.
How to Customize a Header in WordPress
1.Source and Edit your image
The image that you decide to use for your header is important. It is the first thing that your users will see and could easily be the thing that convinces them to stay and interact with your site rather than clicking away. Selecting an enticing image can seem daunting, but don’t overthink it. Take a look at some free images (there are a lot of free images on the internet and quite a few dedicated sites for finding free stock photos) and see what fits with your site. You want your image to be high-quality, simple, and unique. Once you find a good image, you will likely have to edit it.
Editing images really isn’t that complicated, and there are a lot of free programs out there like GIMP that gives you some of the most useful editing tools for free. Most of the time you may just need a different size for your image but you can also go in and make more complex edits, such as color enhancement, to the image.
2.Add a Text Area to the Header
Once you have your image picked out you can move on to adding text, widgets, and logos. To add a test area to your header you will have to write some code in header-image.php file. Add the following code to add a text area to your header.
<div class=”custom-header”>
<div class=”custom-header-media”>
<?php the_custom_header_markup(); ?>
</div>
<div class=”custom_textbox”>
<div class=”custom_textbox_content”><p>This is my dummy content</p></div>
</div>
After adding this code you’ll see a text box in your header, allowing you to add any phrase to your WordPress header.
3.Add Social Icons
To add social icons to your header you will need to add the following code to site-branding.php after wrap class.
<div class=”social_links”>
<ul>
<li>
<a href=”” class=”custom_facebook_icon”>
<img alt=”customfacebook” src=”http://localhost/wordpress/wp-content/uploads/2018/01/facebook.png” />
</a>
</li>
<li>
<a href=”” class=”custom_twitter_icon”>
<img alt=”customtwitter” src=”http://localhost/wordpress/wp-content/uploads/2018/01/twitter.png” />
</a>
</li>
<li>
<a href=”” class=”custom_googleplus_icon”>
<img alt=”customgoogleplus” src=”http://localhost/wordpress/wp-content/uploads/2018/01/google-plus.png” />
</a>
</li>
</ul>
</div>
You can also use CSS to add a unique style to your icons depending on what you want them to look like.
4.Add a Widget to your Header
If you want to add some widgets to the header of your site you will need to define a function in the function.php file. Add the following code to the end of the file:
function custom_widgets()
{
register_sidebar( array(
‘name’ => ‘Custom Header Position’,
‘id’ => ‘custom_header_position’,
‘description’ => __( ‘An optional widget area for your site header’, ‘testtt’ ),
‘before_widget’ => ‘<aside id=”CustomWidget” class=”custom_widget”>’,
‘after_widget’ => “</aside>”,
‘before_title’ => ‘<h3 class=”widget-title”>’,
‘after_title’ => ‘</h3>’,
) );
}
add_action( ‘widgets_init’, ‘custom_widgets’ );
Once you have added that, you will need to add this HTML code to header-image.php file for your widget to show up properly on the front end of your site.
<?php
if ( is_active_sidebar( ‘custom_header_position’ ) ) : ?>
<div id=”header-widget-area” class=”custom-widget-area widget-area” role=”complementary”>
<?php dynamic_sidebar( ‘custom_header_position’ ); ?>
</div>
<?php endif; ?>
Next, you will move to Appearance > Widgets and select which of your widgets you wish to move into your custom header. Widgets can simply be dragged and dropped into their desired location on this screen.

5.Repositioning the Logo
You can add a logo to your header by navigating to Appearance > Header > Header Media > Logo Section. From here you can easily select the logo that you want to use. Depending on your theme this logo may show up in different areas on your header and to reposition it you will need to write some additional CSS. The following code will move your logo to the center position, but you can likewise reposition your logo to anywhere you may want within the header.
.custom-logo-link {
padding-right: 2em;
position: absolute;
left: 500px;
top: 0px;
}
6.Adding a Video to your Header
If desired, you can also add a video to your header. Thankfully, this is a customization option that doesn’t require additional code and instead is provided within a default option. Navigate to Appearance > Header > Header Media > Header Video to select the video you wish to add to the header. You can either browse for the video on your computer or enter a URL for an online video.