ClickFunnels and Infusionsoft are two very powerful programs. ClickFunnels helps you generate leads, and Infusionsoft allows you to maintain good relations and communicate with those contacts. By themselves they are fantastic, but together they become a powerhouse! To connect these two programs and have them work together, we will use an awesome middleman program called Zapier.
Configuring the ClickFunnels and Infusionsoft Campaigns.
- To begin, you’ll need to make sure that any changes you have made to your Infusionsoft campaign have been published.
- Next make sure that any changes you have made to your Clickfunnels Campaign have been published.
- While you are in Clickfunnels, make sure that the domain is the correct domain that you want the funnel to display on. To do that, perform the following:
- Click on the funnel you will be using to connect to Infusionsoft.
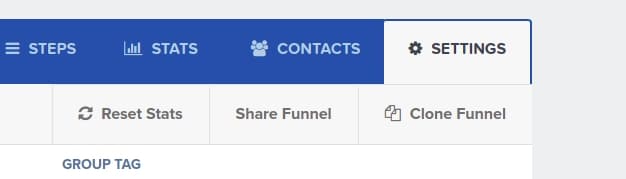
- In the upper right-hand corner, there will be a button called “Settings,” click on this button and then select “Domains.”

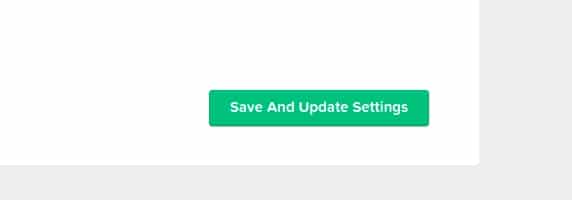
- Enter the domain you want the funnel to display on in the “Domain box.” Once you have done this, click the “Save and Update Settings” button at the bottom of the page.

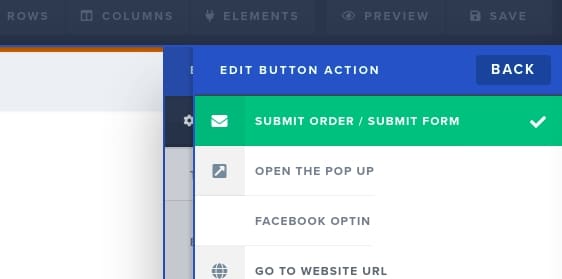
- Next, you’ll need to ensure that the ClickFunnels “Form Submit” button is set to “Submit Order/Submit Form.” This can be accomplished by following the steps below:

- Hover over the button and select the gear icon from the orange banner that appears around the button. This will bring up a menu.
- Select the “Set Action” option on that menu.
- This will open another menu and you’ll need to select the “Submit Order/Submit Form” option from this menu.
- Once you have selected this option, hit the “back” button located at the top of the menu.
Configuring Zapier
From here on out we’ll be working with Zapier. Zapier integrates two apps so that they can work together. These integrations are called “Zaps.” These Zaps work on an “If-Then” system. In other words, we can set up actions so that “If” something happens in one app (ClickFunnels), “Then” Zapier will execute some other action in a different app (Infusionsoft). We will begin by creating a Zap, setting the “Ifs” (these are called triggers in Zapier), and then setting up the “Then” actions (called actions in Zapier).
Creating a Zap and Setting up the “When This Happens… steps” (Trigger or “If” steps).
- Log into Zapier.
- Begin by clicking the button that says, “Make a Zap.”
- Name your Zap in the upper left-hand corner where it says, “Name your Zap.” You can name it what ever you want, but something related to your intended action is probably best.
- You’ll then be asked to choose a trigger app. Search for and select “ClickFunnels” as your trigger app.
- Next, you’ll need to choose your trigger event. Click the drop-down menu and select “New Contact Activity” from the list. Once you have selected your trigger event, click continue.
- You’ll then be asked to choose an account. Click the drop-down menu and select your ClickFunnels account. After you’ve selected the account, click continue.
- You’ll then be prompted with a “Funnel Option” page where you’ll narrow down your triggers a bit. Begin by selecting the desired funnel.
- Next choose the form you want to trigger on. If there is only one form in your entire funnel, then select all funnel steps. If you have more than one form in your funnel, then select the specific funnel step you want to trigger from. When you are finished, click continue.
- Your almost done here, we just need to test the trigger by hitting the “Test and Continue” button.
Set up your Do This… Steps (Action or “Then” steps)
- Next, we need to set up our Action steps or what will happen when someone completes the target event. Click on the “Do this…” button.
- This process is pretty much the same as setting up the trigger. Begin by selecting the app you wish to use. In this case, select “Infusionsoft by Keep.”
- Next, choose the event you want to have happen. In this case, choose “Create/Update Existing Contact.” When you are finished, hit continue.
- You’ll then be prompted to pick an account. Select your Infusionsoft account from the dropdown menu. Once you’ve selected the account, click continue.
- Next, Connect the Infusionsoft fields to the fields supplied by ClickFunnels.
- The “Tag Names” option allows you to apply tags to the contact. Applying tags is how you drop that contact into an Infusionsoft campaign.
- When you have finished, click the “Test and Review” button.
- If everything worked to your satisfaction, click the “done editing” button.
- The final step is to push the big button that says, “Turn your zap on”.
Finishing Up
Once the above steps are complete, you’ll want to test the entire process by submitting the form and verifying the contact is created & the campaign(s) are triggered. Check to make sure the contact is in Infusionsoft, that the contact information is in the proper fields, that they received the tags you were expecting them to receive & that the campaigns are working as expected.
Just like that you have linked your ClickFunnels campaign to your Infusionsoft Campaign. You can check that one off your to-do list and rest easy as your new automated system handles your marketing.