Are you looking to get started in the exciting world of WooCommerce selling and shipping? If so, you’ll need to take some time out to educate yourself about the different WooCommerce shipping classes. To give your customers the best price breaks available and increase your chances for success, we’ll be discussing shipping classes for you today.
What are the WooCommerce shipping classes? The WooCommerce shipping classes include flat rate, a charge per class, and a charge per order. Flat rate shipping allows you to set any flat-rate cost for your shipping costs. Charging by class lets you select the shipping cost by class individually. Last, you can also use charge per order shipping, which typically charges the highest rate for shipping.
Since there isn’t a lot of information available on the Internet today that covers WooCommerce shipping classes, we created this guide to help you out. Below we’ll discuss some necessary information about the WooCommerce shipping classes, and we’ll review how you can use the WooCommerce shipping classes in your online store.
Getting to Know WooCommerce Shipping
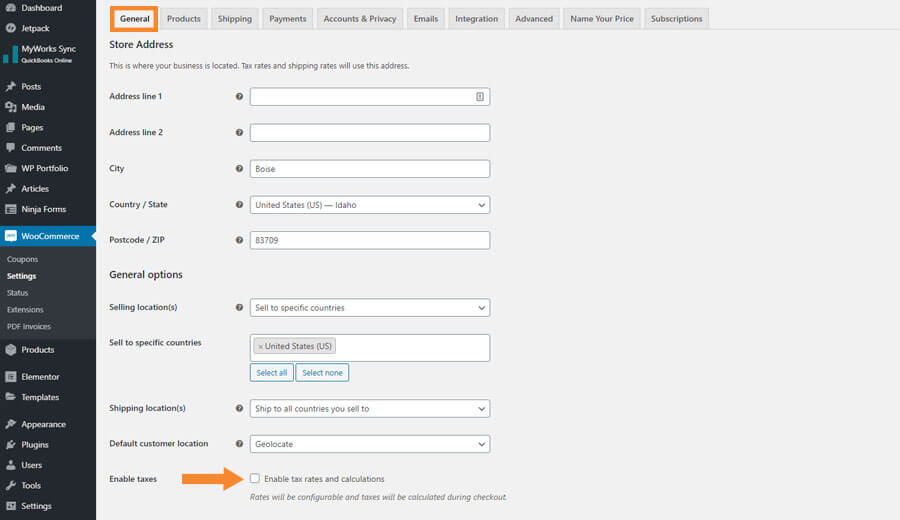
To begin with, we’re going to discuss the basics of WooCommerce shipping. So, to access those features, you’ll need to log into your WooCommerce account. Then, select “settings.” Last, select “shipping.” Once you access this part of WooCommerce, you’ll be able to see the different WooCommerce shipping zones listed.

Shipping Zones
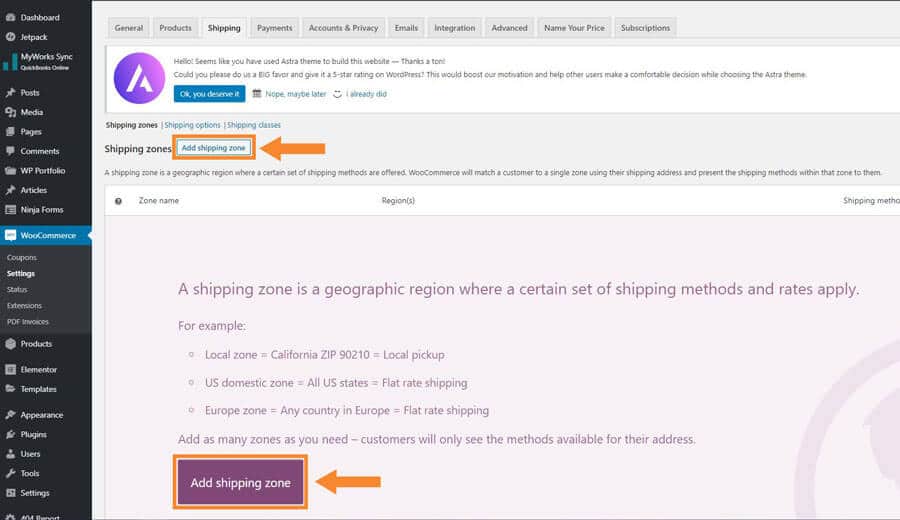
So, what are the general shipping zones in WooCommerce? WooCommerce defines a shipping zone as “a geographic region where a certain set of shipping methods are offered.” WooCommerce continues, “WooCommerce will match a customer to a single zone using their shipping address and present the shipping methods within that zone to them.”
The different zones you’ll be able to focus on for WooCommerce include the following:
- Great Britain and the United Kingdom, which allows for flexible shipping options.
- The United States, which offers both USPS and flexible shipping options.
- Locations not covered by other zones, which is up for optional use for regions that aren’t in the different shipping zones.
When you access the shipping zone menu in WooCommerce, then you’ve entered the first significant area of the WooCommerce shipping world that you’ll need to know more about immediately. When you are in the shipping zones area, you’ll need to add your first zone to start the process.
How to Add a Shipping Zone
Now that you know how to access the shipping zone feature in WooCommerce, the next thing you’ll need to learn about is how to add a shipping zone. We’ve outlined the steps below:
- First, click on “add the first zone.”
- Next, you’ll need to name your zone. At that time, you’ll also need to pick the regions you’ll use within the area, like Poland or France. When you add the zone, you’ll be able to limit postal codes if you want to, and that can help you if you’re going to provide local delivery or pickup options.
- Once you’ve added that information, you’ll need to click on “save changes” to save the information you just created. If you forget to do this, the system will forget, and you’ll have to come back and re-configure everything later.
Once you’ve created your zones, it then becomes quite easy to edit your zone. You can easily edit your zones in WooCommerce by using the quick links area. To do this, you want to move your cursor over the zone’s name that you want to edit. Once you do that, you’ll see a list of options. You’ll be able to select “edit a zone,” “remove a zone,” or you can browse through the shipping and add another zone.
You’ll also be able to sort out zones when you start playing around with this part of WooCommerce. Keep in mind that if you do sort the zones, the client will get the first shipping zone that matches their delivery area. When you configure zones with overlapping regions, don’t forget to save the information.
Shipping Methods
Now that you’ve learned about how to create a shipping zone, you’ll need to understand the different shipping methods in WooCommerce. Knowing how to add shipping zones is just the first step in the process. Once you know shipping zones, you’ll be able to easily add and modify the shipping options you want to offer.
To modify the shipping methods that you offer, you’ll want to click on the small “plus” icon that you’ll find in the “Shipping Method(s)” column area of WooCommerce. Once you do that, you’ll be able to move on and add another available option. Before you add the shipping methods, you’ll want to use, and you’ll need to know some of the shipping methods that WooCommerce already offers.
Once you get into this part of WooCommerce, you’ll see that there are three different shipping method classes provided by the website. Those options are:
- Flat rate shipping, which allows you to charge a specific rate for shipping.
- Free shipping, which you can offer to clients with coupons or minimum spends.
- Local pickup, which means the customers come and get the item or items themselves. If you select this option, local pickup store base taxes will automatically be charged to the customer’s order.
Interestingly, once you start adding shipping methods in WooCommerce, you’ll notice that you can add each type of shipping method several times. That helps to make it easy for you to offer different kinds of shipping methods very quickly. However, the application’s use feels a bit limited at times. That’s because the customer will see all of the ways you created in their cart, and the items they have in their cart will influence their shipping prices.
Using Shipping Zone Settings
Much like the zones, you can also sort your shipping methods. You’ll want to know how to do this because it sets up the order with which your customers will see the zones. You can set the method or remove it by using the “Quick links” feature on WooCommerce. Or, you can simply click the name of the technique and modify it.
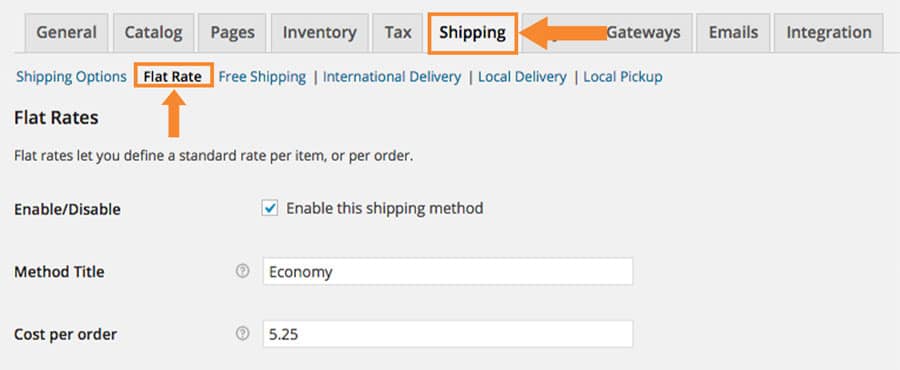
Flat Rate Settings
When you access this area, you’ll see things like “method title,” “tax status,” and “cost.” We’ll break down what each one of these items means below.
- Method title means you’ll be selecting the payment method your customers will see on your website.
- Tax status means you’ll need to figure out if the shipping method you are offering will be taxable or not.
- Cost means the cost of shipping the whole order.
- An additional cost is another option you’ll find under “Cost.” Here you can add any special pricing for the number of items the customer has in his or her card. You can add additional costs based on things like quantity, percent, etc.
If you’ve already set-up your shipping classes, you’ll be able to see some extra fields now when you go into flat rate settings. We’ll now talk about how you can configure your shipping classes in a bit more detail below.
When you go into your flat rate settings and classes, you’ll now see a few additional fields. You’ll need to set-up these fields so that your store will be ready for your customers. The other fields you’ll see include:
- Shipping Class Cost—You’ll notice a separate field area where you can put the shipping cost you want to charge based on each class of item you’ve listed. When the order takes place, it happens based on the order you’ve set-up in your “Shipping Classes” area. You may also set additional costs on certain classes as you see fit.
- No Shipping Class Cost—This option becomes essential if you plan to use the per class calculator, which we’ll cover in a bit more detail below.
- Calculation Type—You can select from two options depending on how you want WooCommerce to calculate the shipping costs on your shipping classes. You can either set up your costs per class or per order. If you set-up your costs per class, then the shipping cost will be the total of the price for each shipping class. If you decide to use the per order option, then WooCommerce will look at all of the items in the cart, and default to the most expensive shipping class.
Free Shipping Settings
So, what about the free shipping settings? If you are using this shipping method, then the carts’ total will make sure that the shipping is free for the customer. When you dive into your free shipping settings, you’ll be able to select from one of the following free shipping options for your customers:
- N/A, which you can pick if you want all of your shipping costs to be free for your customers.
- A free shipping coupon, which you can make an offer so that loyal clients can take advantage of a free shipping offer. You can create coupons in WooCommerce by going into the WooCommerce menu and selecting “coupons.”
- You can also allow customers with a minimum order amount (say, for those who spend more than $50), which will then entitle your customers to earn their free shipping.
- You can also make a minimum order amount coupon for free shipping.
Remember, if you want to offer free shipping coupons, you’ll be able to use the coupons when you set the minimum order for free shipping.
Local Pickup Settings
Figuring out how to set-up your regional pickup settings in WooCommerce is very similar to setting up flat rate shipping. To begin, you’ll need to select “local pickup.” More than likely, the shipping on this option will be free of charge. If that’s the case, don’t worry about the tax status and the cost.
Table Rate Shipping
Not all online stores can offer flat rate shipping options depending on the types of products that they sell. If you happen to fall into a similar category, then don’t worry. WooCommerce also offers an option called table rate shipping, which will allow you to sell products that are different sizes and weights and ship them more easily.
If you resemble this need and you need something to solve your advanced shipping cost calculations, then you’ll love this feature in WooCommerce. You’ll want to set-up your table rate shipping method. That way, you can set your own rules and have the website calculate shipping costs on an as-needed basis.
When you decide how you want to set-up your shipping costs in the table rate shipping method area of WooCommerce, you’ll be able to base your rules on things like weight, totals, item and cart, and shipping classes.
WooCommerce Shipping Options
When it comes to understanding WooCommerce shipping, you’ll also need to know a bit about setting up the general options as they apply to ship your products. We’ll cover a bit more information about how WooCommerce shipping options work below.
If you decide you want to use the general options are in shipping, then you’ll need to enable the shipping calculator, which you’ll find on your cart’s page. You’ll need to select the option if you want your customers to be able to calculate the shipping cost based on the area where they live.
To do that, you’ll need to set-up the factors that will affect the overall shipping calculator in Woo Commerce. You’ll be able to select from some of the following options:
- You can hide shipping costs until the customer enters an address. If you decide you want to use this approach and have shipping costs calculated only in the final summary, check this box.
- You can also pick the shipping destination, and select whether the customer’s shipping or billing address is the default shipping address. (We recommend the shipping address being the shipping destination for far less stress).
Shipping Classes
Another important tool you’ll need to set-up when it comes to shipping is the shipping classes. This feature will become necessary if you are the type of online store that offers products of varying weights and sizes. So, how to you add shipping classes? We’ll cover that information in a bit more detail below.
When you want to add a shipping class, first select “add shipping class.” Then, you’ll need to fill out the name of the shipping class as well as a description of the shipping class, which you’ll keep for future reference. WooCommerce then uses slugs, or unique identifications, to automatically fill out information you might leave empty. If you decide you want to edit or delete a shipping class, all you need to do is move your cursor over the class’s name.
Once you’ve set-up your shipping classes, you’ll need to move on and start assigning different shipping classes to different products.
How to Assign Shipping Classes
When you want to assign a shipping class after you’ve created a product, you’ll need to go into the menu, then select “products.” After that, decide “edit a select product,” than “product data,” and last, “shipping.”

If you want to edit a shipping class for a particular product, then simply select the shipping class you created, and then go ahead and update the product.
Now, some products have a few different variations. If you offer any products like that in your WooCommerce store, then you can assign different shipping classes for each variety of the product. If you want to do that, go to “variations,” and then select the “product data” tab.
If you want to assign shipping classes to products that are being bought in bulk, then you can assign the selected shipping class to as many products as you’d like to simultaneously. To do this, you’ll want to start by going to menu Products. Next, select a few products. After you do that, go into the bulk actions list and select “Edit.” Then, click on “Apply.”
The Products List in Bulk
When you are in your products list, you’ll need to start by selecting your shipping class from the list. Once you choose your shipping class, you can bulk edit shipping classes for all of your products. After you’ve edited them, click on “Update.” Then, you’ll be finished.
What Are Conditional Shipping Payments?
Now we need to discuss what conditional shipping means in WooCommerce. Let’s start out explaining this one by giving an example. Imagine that you want customers who selected free shipping to use cash or bank transfer payment methods only. On the other hand, you’re fine with the customers who have chosen a courier to pay by cash, bank transfer, or online transfer.
The example we just gave you here provides you an incident of conditional shipping payment.
However, there is a problem with this feature. Your out-of-the-box version of WooCommerce won’t allow you to assign payment methods to different shipping options. You can only do this when it comes to paying Cash on Delivery, which you can display along with other shipping options if you wish.
Since other payment methods will be shown each time a customer orders, regardless of the shipping option the client wanted, this can be annoying for sellers who don’t want to offer the ability to pay using online transfers that have very costly fees associated with them.
Use a Plug-In
There is an effective WooCommerce solution to this problem, however. With the correct WooCommerce plug-in, you can figure out how to offer conditional payments on your WooCommerce website. Luckily, you can utilize the Active Payments for WooCommerce plug-in, and you’ll be able to solve your problem with ease.
If you opt to use this plug-in, you’ll be able to mix and match the payment methods as well as the shipping methods however you see fit. That way, you’ll be able to keep more of your money, and you’ll lose far less money on those expensive online money transfer fees.
Since many companies that offer online transfers are notorious for their high fees, you can easily disable select payment methods when the price is too high. You’ll be able to shut off a payment method when it costs you more than a predetermined amount that you set-up with WooCommerce ahead of time. Remember, substantial payments can cost you significant interest rates, so it’s essential for many WooCommerce store owners to be able to control this feature.
What will you get if you use the Active Payments plug-in? You’ll be able to manage all the features of your WooCommerce payment options conditionally, and you can also charge additional fees. Active Payments will allow you to do the following:
- You can conditionally demonstrate your selected payment options and shipping options.
- You’ll be able to set your cart total and shut-off any payment methods you don’t want to use when the customer pays more than a certain amount, excluding the cost of shipping.
- You’ll get complete control over all of the fees you ask for on your website. That means you control titles, taxes, fixed or percentage fees, minimum order totals, and maximum order totals.
Remember, if you opt to start using the Active Payments plug-in for WooCommerce, you may also want to try the Flexible Shipping plug-in, which this plug-in will interact with for efficiency. However, once you install the Active Payments plug-in for WooCommerce, you’ll need to be careful. If you are applying any other shipping plug-ins on your WooCommerce website, then the conditional payments might not work if the plug-ins don’t work properly together.
Shipping Labels
The last thing you’ll need to consider when it comes to WooCommerce shipping is the use of shipping labels. Once you’ve set up your WooCommerce Shipping Classes, you can sync your settings with a shipping software company. One great option for WooCommerce is Shippo. Shippo has a WooCommerce shipping plug-in that will allow you to make shipping labels that cost precisely the price you are charging your customers for shipping.
Shippo offers you something that is free and works as an out-of-the-box plug-in that will integrate into your WooCommerce store. Here are some of the things you’ll be able to do with Shippo:
- With Shippo, you’ll be allowed to automatically import the orders you get through WooCommerce to be demonstrated in Shippo’s dashboard.
- You’ll get the ability to select specific orders and make shipping labels. You can opt to create your shipping labels as a one-at-a-time event, or as a batch event. When you print your labels with Shippo, you’ll be charged a nickel per tag each time you make a label and use their software. Luckily, that’s a pretty affordable fee.
- Each time you make a label while in Shippo, Shippo will automatically update your fulfillment status in WooCommerce concerning the status of your orders.
- If you need to change an address or an order’s status in WooCommerce, that change will also show up automatically in Shippo.
- If you need more information about Shippo or how to sync your WooCommerce store, you can go here.
Once you’ve got Shippo set-up and ready to go, you’ve got your WooCommerce shipping classes completed. You’ll be prepared to ship your orders to your customers right away. We recommend you test out your website a few times by making a few new orders and using different zip codes. Remember, it’s always essential to test and double-check any modifications you make to your WooCommerce website before you open the door to customers.
You don’t want to have your website not work so that you have to modify charges on orders. You can probably imagine the type of nightmare that the situation would create. So, to stay safe, play around with a few new orders, select different regions, and see how your WooCommerce is now operating when shipping orders.
Once you’ve made a few new orders, tried things out, and you can verify that your modifications and adjustments to your WooCommerce shipping options are all working correctly, you’ll be ready to go. So at that point, it’ll be time to congratulate yourself and get to your advertising and selling plans.
Final Thoughts
When WooCommerce 2.6 first brought us the concept of shipping zones, having an online store become much more straightforward. The configuration options related to WooCommerce shipping features, with a bevy of plug-in options available besides the ones that we mentioned, means it is quite simple to edit your website’s shipping and have your store set-up exactly how you want it. With so many options of how to differentiate pricing, you’ll be able to set-up your store just the way you want it.
Remember, when it comes to figuring out shipping costs, the price of shipping isn’t only affected by the distance. You’ll also have to factor in the weight and size of the items you are shipping when you try to figure out shipping expenses. Chances are, you probably don’t offer products that are all the same weight. So, you’ll need to make sure that your WooCommerce site can adjust shipping costs based on the weights of different items. By using the shipping classes, you can.
With WooCommerce shipping classes, you’ll now be able to control the shipping rates based on the type of product or products that are purchased. So, if you do sell products that are heavy, which usually means they’ll cost more money to ship, and lightweight products, which tend to cost less to ship, then you’ll be able to modify your shipping rates easily.